[highlight] THIS PAGE HAS MOVED TO: http://www.tinkernut.com/portfolio/homemade-remote-controlled-spycam/ [/highlight]


[vc_row][vc_column width=”2/3″][vc_separator][venera_framed_image content_type=”video” css_animation=”appear” frame_type=”browser” slider_engine=”flexslider” video_link=”https://www.youtube.com/watch?v=cV4MdQuRArE” browser_url=”https://www.youtube.com/watch?v=LssEe_xx3eI”][vc_separator][/vc_column][vc_column width=”1/3″][/vc_column][/vc_row][vc_row][vc_column width=”2/3″][vc_tabs][vc_tab title=”About This Project” tab_id=”1402713028-1-39e9a4-2f888a6d-d37d76d3-94ce5609-2f71″][vc_column_text]
Sound waves can be used for more than just making sound. Find out all the amazing things sound is capable of and make some cool projects that harness it’s power!
Click on the tabs to continue learning about ultrasound!
Here are some of the other cool projects you we’ll be creating:
[/vc_column_text][/vc_tab][vc_tab title=”Parts and Downloads” tab_id=”1402713028-2-39e9a4-2f888a6d-d37d76d3-94ce5609-2f71″][vc_button title=”Download Arduino Code” target=”_self” color=”btn-primary” icon=”none” size=”btn-huge” href=”http://www.tinkernut.com/demos/369_ultrasound/ultrasound_ruler_demo.zip”][vc_column_text]
The prices really depend on what you would like to purchase. These are cheapest locations to purchase these items that I was able to find.
| Part name | Price |
|---|---|
| Ultrasonic Module | $2.40 |
| Arduino Uno | $8.75 |
[/vc_column_text][/vc_tab][vc_tab title=”Continued Learning Links” tab_id=”1402753981900-3-108a6d-d37d76d3-94ce5609-2f71″][vc_column_text]
[/vc_column_text][/vc_tab][/vc_tabs][/vc_column][vc_column width=”1/3″][/vc_column][/vc_row]

[vc_row][vc_column width=”2/3″][vc_separator][venera_framed_image content_type=”video” css_animation=”appear” frame_type=”browser” slider_engine=”flexslider” video_link=”https://www.youtube.com/watch?v=WIMhraVcdTg” browser_url=”https://www.youtube.com/watch?v=WIMhraVcdTg”][vc_separator][/vc_column][vc_column width=”1/3″][/vc_column][/vc_row][vc_row][vc_column width=”2/3″][vc_tabs][vc_tab title=”About This Project” tab_id=”1402713028-1-39afe7-cbb103e5-43f2″][vc_column_text]
Why don’t microwaves and metal get along? What makes microwaves destroy electronics? Let’s dive deep into the world of electromagnetic radiation to find out!
Help support my channel by becoming a patron! Get social!
[/vc_column_text][/vc_tab][vc_tab title=”Parts List” tab_id=”1402713028-2-39afe7-cbb103e5-43f2″][vc_column_text]
Here’s what you will need for each project:
[/vc_column_text][/vc_tab][vc_tab title=”Further Learning” tab_id=”1402713403419-2-1afe7-cbb103e5-43f2″][vc_column_text]
[/vc_column_text][/vc_tab][/vc_tabs][/vc_column][vc_column width=”1/3″][/vc_column][/vc_row]

[vc_row][vc_column width=”2/3″][vc_separator][venera_framed_image content_type=”video” css_animation=”appear” frame_type=”browser” slider_engine=”flexslider” video_link=”https://www.youtube.com/watch?v=WTWe3OcD7u4″ browser_url=”https://www.youtube.com/watch?v=WTWe3OcD7u4″][vc_separator][/vc_column][vc_column width=”1/3″][/vc_column][/vc_row][vc_row][vc_column width=”2/3″][vc_tabs][vc_tab title=”About This Project” tab_id=”1402713028-1-39afe7-cbb1″][vc_column_text]
What do you need to make the simplest form of a speaker? Surprisingly, you probably already have everything you need! Click on the “Parts list” tab to see what you need to make both bone conducting headphones and your own speaker! Then, if you still want more, click on the “Further Learning” tab to learn more about the history of speakers!
Help support my channel by becoming a patron!
Get social!
[/vc_column_text][/vc_tab][vc_tab title=”Parts List” tab_id=”1402713028-2-39afe7-cbb1″][vc_column_text]
Here’s what you will need for these projects:
[/vc_column_text][/vc_tab][vc_tab title=”Further Learning” tab_id=”1402713403419-2-1afe7-cbb1″][vc_column_text]
[/vc_column_text][/vc_tab][/vc_tabs][/vc_column][vc_column width=”1/3″][/vc_column][/vc_row]

[one_half]
[/one_half]
[one_half last=last]
[slogan h1=”Tinkernut Labs” h3=”Basic overview of what we will be doing”][/slogan]
This video will show you how the basics of projection mapping and how to do it on the cheap!
[/one_half]
[clear]
[slogan h3=”Parts and Downloads”][/slogan]
You’ll need a projector, so here are a few options:
[ox_list type=”ox_list_animated”]
[/ox_list]
TOTAL COST: ~$60.00 or less
[slogan h3=”Important Links”][/slogan]
LG Electronics Building Projection
[slogan h3=”Support”][/slogan]
[ox_list type=”ox_list_simple”]
[/ox_list]
[social_link style=”stamp” type=”twitter_account” url=”http://www.twitter.com/tinkernut” target=”on” ]
[social_link style=”stamp” type=”facebook_account” url=”http://www.facebook.com/tinkernut” target=”on” ]
[social_link style=”stamp” type=”paypal_account” url=”https://www.paypal.com/cgi-bin/webscr?cmd=_s-xclick&hosted_button_id=WBKTMVZGY7XXN” target=”on” ]
[social_link style=”stamp” type=”youtube_account” url=”http://www.youtube.com/gigafide” target=”on” ]

[vc_row][vc_column width=”2/3″][vc_separator][venera_framed_image content_type=”video” css_animation=”appear” frame_type=”browser” slider_engine=”flexslider” video_link=”https://www.youtube.com/watch?v=1R0UgIgcb5g” browser_url=”https://www.youtube.com/watch?v=1R0UgIgcb5g”][vc_separator][/vc_column][vc_column width=”1/3″][/vc_column][/vc_row][vc_row][vc_column width=”2/3″][vc_tabs][vc_tab title=”About This Project” tab_id=”1402713028-1-39e9a4-2f886e2a-7d43″][vc_column_text]
Learn how to make a cluster computer using Raspberry Pi’s! You can also use this method to build your own super computer.
[/vc_column_text][/vc_tab][vc_tab title=”Parts and Downloads” tab_id=”1402713028-2-39e9a4-2f886e2a-7d43″][vc_column_text]
TOTAL COST: ~$100.00 [tabby title=”Software”]
[/vc_column_text][/vc_tab][vc_tab title=”Code” tab_id=”1402753910272-3-86e2a-7d43″][vc_column_text]
sudo raspbi-config“. Here’s the options we’ll need to configure
sudo nano /etc/inittab”
#1:2345:respawn:/sbin/getty --noclear 38400 tty11:2345:respawn:/bin/login -f pi tty1 </dev/tty1 >/dev/tty1 2>&1[tabby title=”Terminal Commands”]
Installing MPICH
sudo apt-get update
mkdir mpich2
cd ~/mpich2
wget http://www.mpich.org/static/downloads/3.1/mpich-3.1.tar.gz
tar xfz mpich-3.1.tar.gz
sudo mkdir /home/rpimpi/
sudo mkdir /home/rpimpi/mpi-install
mkdir /home/pi/mpi-build
cd /home/pi/mpi-build
sudo apt-get install gfortran
sudo /home/pi/mpich2/mpich-3.1/configure -prefix=/home/rpimpi/mpi-install
sudo make
sudo make install
nano .bashrc
PATH=$PATH:/home/rpimpi/mpi-install/bin
sudo reboot
mpiexec -n 1 hostname
Installing MPI4PY
sudo aptitude install python-dev
wget https://mpi4py.googlecode.com/files/mpi4py-1.3.1.tar.gz
tar -zxf mpi4py-1.3.1
cd mpi4py-1.3.1
python setup.py build
python setup.py install
export PYTHONPATH=/home/pi/mpi4py-1.3.1
mpiexec -n 5 python demo/helloworld.py
[/vc_column_text][/vc_tab][vc_tab title=”Important Links” tab_id=”1402753981900-3-106e2a-7d43″][vc_column_text] Help support my channel: http://www.patreon.com/tinkernut Follow Tinkernut! Google + Facebook Twitter [/vc_column_text][/vc_tab][/vc_tabs][/vc_column][vc_column width=”1/3″][/vc_column][/vc_row]
[vc_row][vc_column width=”2/3″][vc_separator][venera_framed_image content_type=”video” css_animation=”appear” frame_type=”browser” slider_engine=”flexslider” video_link=”https://www.youtube.com/watch?v=bSz4FQPsir8″ browser_url=”https://www.youtube.com/watch?v=bSz4FQPsir8″][vc_separator][/vc_column][vc_column width=”1/3″][/vc_column][/vc_row][vc_row][vc_column width=”2/3″][vc_tabs][vc_tab title=”About This Project” tab_id=”1402713028-1-39e9a4-2f8846d9-0fc4″][vc_column_text]
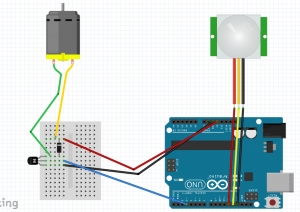
In case you want a nerdier way to make a cheap motion detecting squirt gun, Here’s how you can build your own with an Arduino and a PIR sensor!
[/vc_column_text][/vc_tab][vc_tab title=”Parts and Downloads” tab_id=”1402713028-2-39e9a4-2f8846d9-0fc4″][vc_column_text]
TOTAL COST: ~$45.00
[/vc_column_text][/vc_tab][vc_tab title=”Assembly” tab_id=”1402753910272-3-846d9-0fc4″][vc_column_text]
 [tabby title=”Step 3″]
const int pirPower = 13; const int pirIn = 12; int motorPin1 = 3; void setup(){ pinMode(pirPower, OUTPUT); pinMode(pirIn, INPUT); pinMode(motorPin1, OUTPUT); digitalWrite(motorPin1, LOW); digitalWrite(pirPower, HIGH); } void loop(){ int value= digitalRead(pirIn); if (value == HIGH){ digitalWrite(motorPin1, HIGH); delay(500); digitalWrite(motorPin1, LOW); } }
[/vc_column_text][/vc_tab][vc_tab title=”Important Links” tab_id=”1402753981900-3-1046d9-0fc4″][vc_column_text] Help support my channel: http://www.patreon.com/tinkernut Follow Tinkernut! Google + Facebook Twitter [/vc_column_text][/vc_tab][/vc_tabs][/vc_column][vc_column width=”1/3″][/vc_column][/vc_row]
[vc_row][vc_column width=”2/3″][vc_separator][venera_framed_image content_type=”video” css_animation=”appear” frame_type=”browser” slider_engine=”flexslider” video_link=”https://www.youtube.com/watch?v=T7zxvW7MZac” browser_url=”https://www.youtube.com/watch?v=T7zxvW7MZac”][vc_separator][/vc_column][vc_column width=”1/3″][/vc_column][/vc_row][vc_row][vc_column width=”2/3″][vc_tabs][vc_tab title=”About This Project” tab_id=”1402713028-1-39e9a4-2f888a6d-d37d”][vc_column_text]
In this April Fools day video, learn how to make a cheap motion detecting squirt gun using parts that you can find in your local grocery store!
If you want a geekier way to build a motion detecting squirt gun, check out the Arduino version of this same project.
[/vc_column_text][/vc_tab][vc_tab title=”Parts and Downloads” tab_id=”1402713028-2-39e9a4-2f888a6d-d37d”][vc_column_text]
TOTAL COST: ~$25.00
[/vc_column_text][/vc_tab][vc_tab title=”Assembly” tab_id=”1402753910272-3-88a6d-d37d”][vc_column_text]