• Make Your Own Cluster Computer (Part 2)


    [vc_row][vc_column width=”2/3″][vc_separator][venera_framed_image content_type=”video” css_animation=”appear” frame_type=”browser” slider_engine=”flexslider” video_link=”https://www.youtube.com/watch?v=lHmFRlETTcQ” browser_url=”https://www.youtube.com/watch?v=lHmFRlETTcQ”][vc_separator][/vc_column][vc_column width=”1/3″][/vc_column][/vc_row][vc_row][vc_column width=”2/3″][vc_tabs][vc_tab title=”About This Project” tab_id=”1402713028-1-39e9a4-2f88″][vc_column_text]

    65_cluster_comp2_thThis is part two of the series that shows you how to make a cluster computer using Raspberry Pi’s!

    You can watch Part 1 here.

    [/vc_column_text][/vc_tab][vc_tab title=”Parts and Downloads” tab_id=”1402713028-2-39e9a4-2f88″][vc_column_text]

    Acquiring the Parts
    Here’s what you will need:

    1. 2 or more Raspberry Pi’s
    2. SD cards for each Pi
    3. Power Cables for each Pi
    4. Powered USB Hub (optional)
    5. Networking Cables
    6. A Hub or a Router

    TOTAL COST: ~$100.00

    [/vc_column_text][/vc_tab][vc_tab title=”Code” tab_id=”1402753910272-3-8″][vc_column_text]

    Installing and Configuring Raspbian

    • Follow the software configuration steps shown in this video and burn the image file to an SD card for each computer in your cluster.
    • For each Raspberry Pi in your cluster, insert an imaged SD card, connect them all to the same router or switch, and then connect a power source to each one.

    [tabby title=”Terminal Commands”]

      • Install nmap
        • Sudo apt-get update
        • Sudo apt-get install nmap
      • Get current IP
        • Ifconfig
      • Scan subnet for Pi’s
        • Sudo nmap -sn 192.168.1.*
      • Run test file
        • Mpiexec -n 1 hostname
      • Make test folder and file
        • Mkdir mpi_test
        • Cd mpi_test
        • Nano machinefile
          • 192.168.1.2
          • 192.168.1.3
          • 192.168.1.4
          • 192.168.1.5
        • Mpiexec -f machinefile -n 4 hostname
      • Add keys to all pi’s
        • PI01
          • Ssh-keygen
          • Cd ~
          • Cd .ssh
          • Cp id_rsa.pub pi01
          • Ssh pi@192.168.1.3
        • PI02
          • Ssh-keygen
          • Cd .ssh
          • Cp id_rsa.pub pi02
          • Scp 192.168.1.2:/home/pi/.ssh/pi01 .
          • Cat pi01 >> authorized_keys
          • Exit
        • PI03 (ssh pi@192.168.1.5)
          • Ssh-keygen
          • Cd .ssh
          • Cp id_rsa.pub pi03
          • Scp 192.168.1.2:/home/pi/.ssh/pi01 .
          • Cat pi01 >> authorized_keys
          • Exit
        • PI04
          • Ssh-keygen
          • Cd .ssh
          • Cp id_rsa.pub pi04
          • Scp 192.168.1.2:/home/pi/.ssh/pi01 .
          • Cat pi01 >> authorized_keys
          • Exit
        • PI01
          • Scp 192.168.1.3:/home/pi/.ssh/pi02
          • Cat pi02 >> authorized_keys
      • Run new machinefile
        • Cd ~
        • Nano machinefile
          • 192.168.1.2
        • Mpiexec -f machinefile -n 4 hostname
      • Run Python file
        • mpiexec -n 5 python demo/helloworld.py
        • Mpiexec -f machinefile -n 5 python /home/pi/build/mpi4py/demo/md5_dict_attack.py
      • Download and unzip file
      • Copy to all computers
        • Scp -r python_test 192.168.1.3:/home/pi
        • Mpiexec -f machinefile -n 5 python python_test/md5_attack.py

    [/vc_column_text][/vc_tab][vc_tab title=”Important Links” tab_id=”1402753981900-3-10″][vc_column_text]

    Help support my channel:

    http://www.patreon.com/tinkernut

    Follow Tinkernut!

    Google +

    Facebook

    Twitter

    [/vc_column_text][/vc_tab][/vc_tabs][/vc_column][vc_column width=”1/3″][/vc_column][/vc_row]

  • Make Your Own Cluster Computer


    [vc_row][vc_column width=”2/3″][vc_separator][venera_framed_image content_type=”video” css_animation=”appear” frame_type=”browser” slider_engine=”flexslider” video_link=”https://www.youtube.com/watch?v=1R0UgIgcb5g” browser_url=”https://www.youtube.com/watch?v=1R0UgIgcb5g”][vc_separator][/vc_column][vc_column width=”1/3″][/vc_column][/vc_row][vc_row][vc_column width=”2/3″][vc_tabs][vc_tab title=”About This Project” tab_id=”1402713028-1-39e9a4-2f886e2a-7d43″][vc_column_text]

    Learn how to make a cluster computer using Raspberry Pi’s! You can also use this method to build your own super computer.

    [/vc_column_text][/vc_tab][vc_tab title=”Parts and Downloads” tab_id=”1402713028-2-39e9a4-2f886e2a-7d43″][vc_column_text]

    Acquiring the Parts
    Here’s what you will need:

    1. 2 or more Raspberry Pi’s
    2. SD cards for each Pi
    3. Power Cables for each Pi
    4. Powered USB Hub (optional)
    5. Networking Cables
    6. A Hub or a Router

    TOTAL COST: ~$100.00 [tabby title=”Software”]

    [/vc_column_text][/vc_tab][vc_tab title=”Code” tab_id=”1402753910272-3-86e2a-7d43″][vc_column_text]

    Installing and Configuring Raspbian

    • Download the Raspbian Image from here.
    • Burn the Raspbian Image to your SD Card
    • Once the image is burned to your SD Card, but it into the Raspberry Pi and boot it up with a Keyboard, Mouse, Monitor and Internet attached.
    • Upon first boot, you should see the Rasbperry Pi Configuration screen (otherwise type “sudo raspbi-config“. Here’s the options we’ll need to configure
        • Expand the File System
        • If needed, set the Internationalization options to match your countries keyboard layout.
        • Overlcock the Pi to 800 Mhz
        • Advanced Options
          • Set the Hostname to Pi01
          • Split the memory to 16mb for graphics
          • Enable SSH
        • Finish out of the configuration, but don’t reboot yet
        • To enable auto-login, at the terminal command type “sudo nano /etc/inittab
          • Comment out this line: #1:2345:respawn:/sbin/getty --noclear 38400 tty1
          • And add this line right beneath it: 1:2345:respawn:/bin/login -f pi tty1 </dev/tty1 >/dev/tty1 2>&1
        • Now you can reboot your Pi and it should auto-login

    [tabby title=”Terminal Commands”]

    Installing MPICH

    • MPICH is software that allows for multi-processing communication between computers.
    • To install it on your Raspberry Pi, first make sure you have a valid Internet connection going to the Pi. Then follow these Terminal Commands
      • sudo apt-get update
      • mkdir mpich2
      • cd ~/mpich2
      • wget http://www.mpich.org/static/downloads/3.1/mpich-3.1.tar.gz
      • tar xfz mpich-3.1.tar.gz
      • sudo mkdir /home/rpimpi/
      • sudo mkdir /home/rpimpi/mpi-install
      • mkdir /home/pi/mpi-build
      • cd /home/pi/mpi-build
      • sudo apt-get install gfortran
      • sudo /home/pi/mpich2/mpich-3.1/configure -prefix=/home/rpimpi/mpi-install
      • sudo make
      • sudo make install
      • nano .bashrc
        • PATH=$PATH:/home/rpimpi/mpi-install/bin
      • sudo reboot
      • mpiexec -n 1 hostname
    • These commands will download and install MPICH, as well as add it as a path to your BASHRC boot file. The last command runs a test to see if it works. If the last command returns “Pi01”, then you did everything successfully.

    Installing MPI4PY

    • As it is, MPICH can run C and Fortran programs. But since the Raspberry Pi has the Python coding environment pre-installed, it would be easiest to install a Python to MPI interpreter. Here’s the commands to do that:

    [/vc_column_text][/vc_tab][vc_tab title=”Important Links” tab_id=”1402753981900-3-106e2a-7d43″][vc_column_text] Help support my channel: http://www.patreon.com/tinkernut Follow Tinkernut! Google + Facebook Twitter [/vc_column_text][/vc_tab][/vc_tabs][/vc_column][vc_column width=”1/3″][/vc_column][/vc_row]

  • Arduino Motion Detecting Squirt Gun


    [vc_row][vc_column width=”2/3″][vc_separator][venera_framed_image content_type=”video” css_animation=”appear” frame_type=”browser” slider_engine=”flexslider” video_link=”https://www.youtube.com/watch?v=bSz4FQPsir8″ browser_url=”https://www.youtube.com/watch?v=bSz4FQPsir8″][vc_separator][/vc_column][vc_column width=”1/3″][/vc_column][/vc_row][vc_row][vc_column width=”2/3″][vc_tabs][vc_tab title=”About This Project” tab_id=”1402713028-1-39e9a4-2f8846d9-0fc4″][vc_column_text]

    In case you want a nerdier way to make a cheap motion detecting squirt gun, Here’s how you can build your own with an Arduino and a PIR sensor!

    [/vc_column_text][/vc_tab][vc_tab title=”Parts and Downloads” tab_id=”1402713028-2-39e9a4-2f8846d9-0fc4″][vc_column_text]

    Acquiring the Parts
    Here’s what you will need:

    1. Raid Auto Trigger
    2. Arduino
    3. PIR Motion Sensor
    4. Diode
    5. NPN Transistor
    6. Wire cutters and wire

    TOTAL COST: ~$45.00

    [/vc_column_text][/vc_tab][vc_tab title=”Assembly” tab_id=”1402753910272-3-846d9-0fc4″][vc_column_text]

    Disassemble the Automatic Sprayer
    Wire Up The Arduino
    Here is a schematic of the Arduino. You can download the Fritzing files by clicking on this link. Screen Shot 2014-03-29 at 3.15.19 PM [tabby title=”Step 3″]

    Add The Code
    Here is a copy of the Arduino code to upload to your arduino. You can also download it by clicking on this link. const int pirPower = 13; const int pirIn = 12; int motorPin1 = 3; void setup(){ pinMode(pirPower, OUTPUT); pinMode(pirIn, INPUT); pinMode(motorPin1, OUTPUT); digitalWrite(motorPin1, LOW); digitalWrite(pirPower, HIGH); } void loop(){ int value= digitalRead(pirIn); if (value == HIGH){ digitalWrite(motorPin1, HIGH); delay(500); digitalWrite(motorPin1, LOW); } }

    [/vc_column_text][/vc_tab][vc_tab title=”Important Links” tab_id=”1402753981900-3-1046d9-0fc4″][vc_column_text] Help support my channel: http://www.patreon.com/tinkernut Follow Tinkernut! Google + Facebook Twitter [/vc_column_text][/vc_tab][/vc_tabs][/vc_column][vc_column width=”1/3″][/vc_column][/vc_row]

  • Motion Detecting Squirt Gun Prank


    [vc_row][vc_column width=”2/3″][vc_separator][venera_framed_image content_type=”video” css_animation=”appear” frame_type=”browser” slider_engine=”flexslider” video_link=”https://www.youtube.com/watch?v=T7zxvW7MZac” browser_url=”https://www.youtube.com/watch?v=T7zxvW7MZac”][vc_separator][/vc_column][vc_column width=”1/3″][/vc_column][/vc_row][vc_row][vc_column width=”2/3″][vc_tabs][vc_tab title=”About This Project” tab_id=”1402713028-1-39e9a4-2f888a6d-d37d”][vc_column_text]

    In this April Fools day video, learn how to make a cheap motion detecting squirt gun using parts that you can find in your local grocery store!

    If you want a geekier way to build a motion detecting squirt gun, check out the Arduino version of this same project.

    [/vc_column_text][/vc_tab][vc_tab title=”Parts and Downloads” tab_id=”1402713028-2-39e9a4-2f888a6d-d37d”][vc_column_text]

    Acquiring the Parts
    Here’s what you will need:

    TOTAL COST: ~$25.00

    [/vc_column_text][/vc_tab][vc_tab title=”Assembly” tab_id=”1402753910272-3-88a6d-d37d”][vc_column_text]

    Disassemble the Air Freshner
    Disassemble the Automatic Sprayer
    Connect the Air Freshner to the Automatic Sprayer
    [/vc_column_text][/vc_tab][vc_tab title=”Important Links” tab_id=”1402753981900-3-108a6d-d37d”][vc_column_text] Help support my channel: http://www.patreon.com/tinkernut Follow Tinkernut! Google + Facebook Twitter [/vc_column_text][/vc_tab][/vc_tabs][/vc_column][vc_column width=”1/3″][/vc_column][/vc_row]

  • Control An RC Car With A Smartphone


    [tabby title=”Video Walkthrough”]
    Learn the basics of controlling objects with your Smartphone through Bluetooth!


    [tabby title=”Parts List”]

    Acquiring the Parts
    Here’s what you will need:

    TOTAL COST: ~$30.00

    [tabby title=”Step 1″]

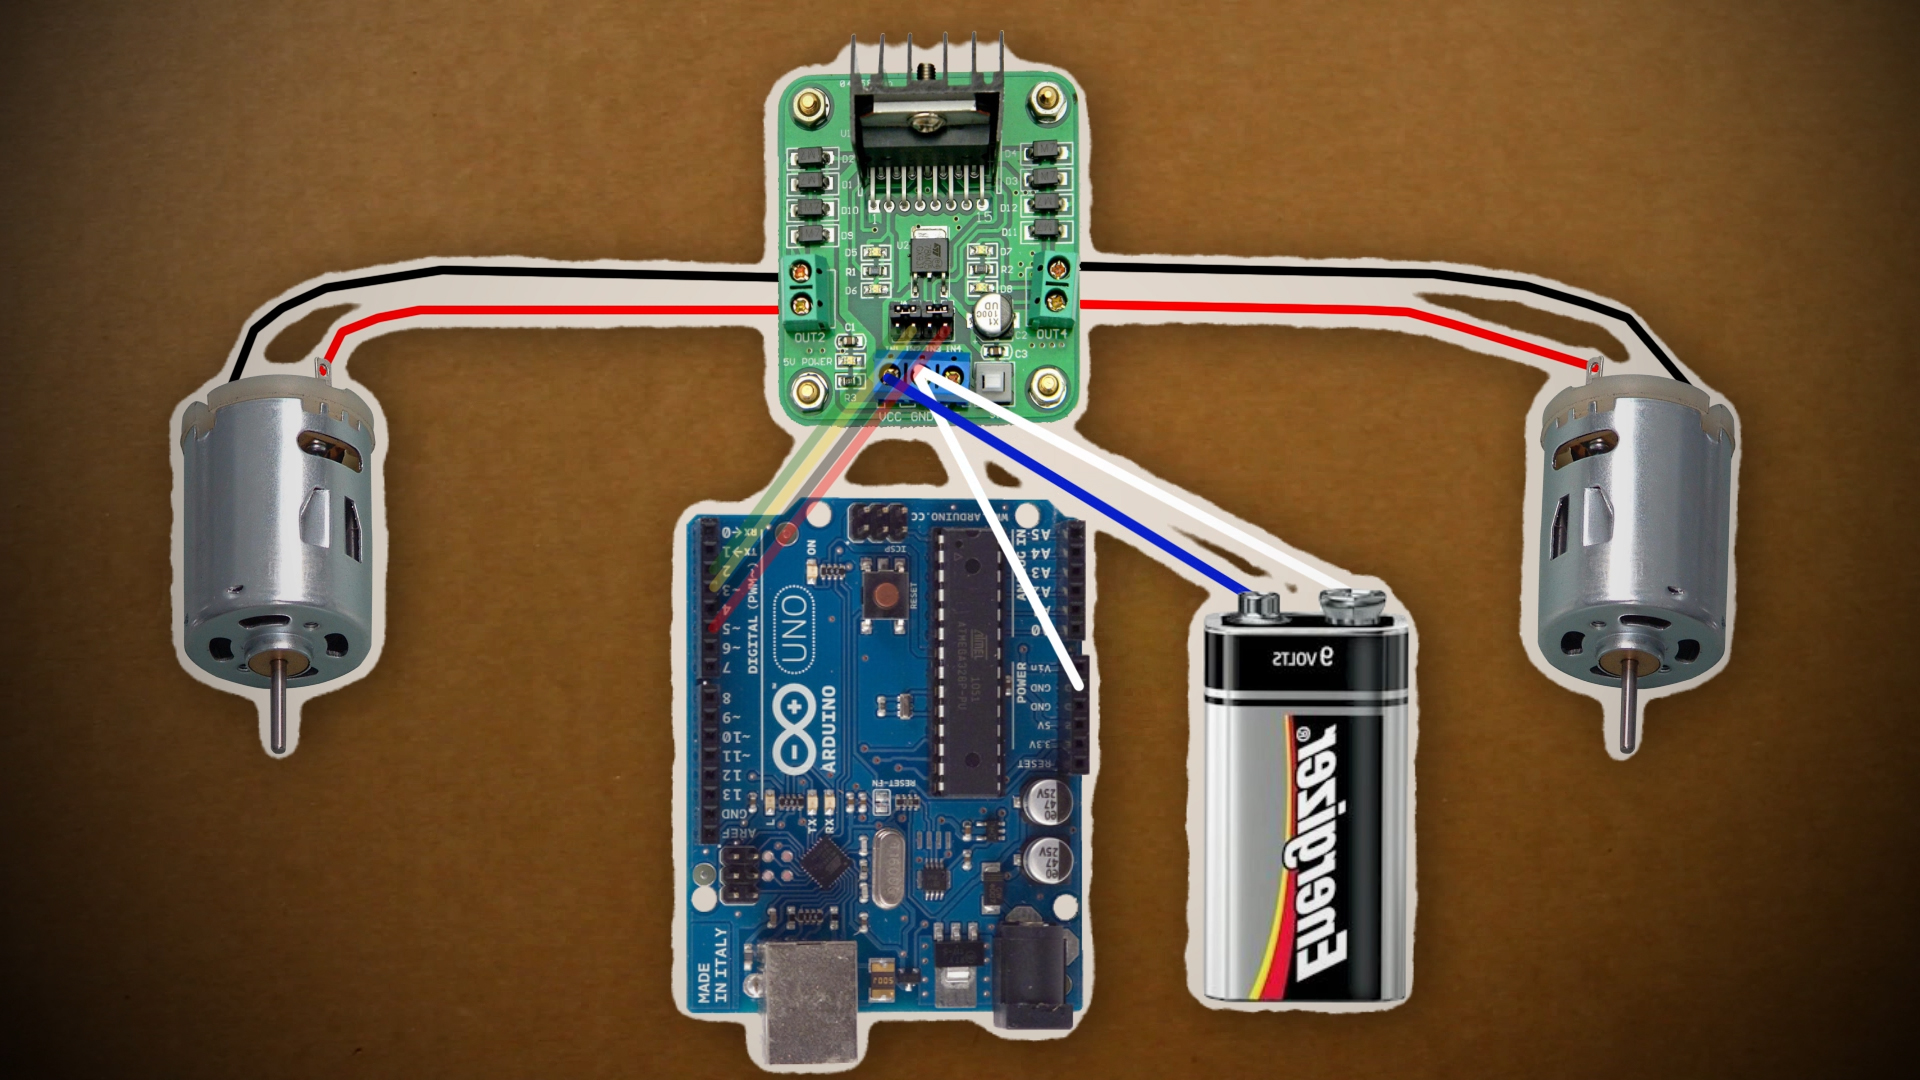
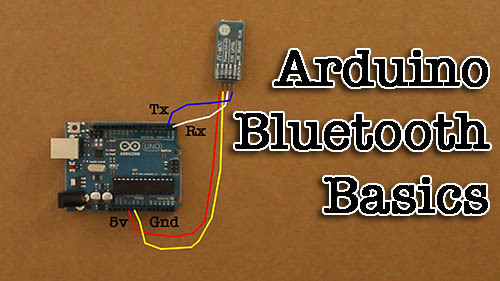
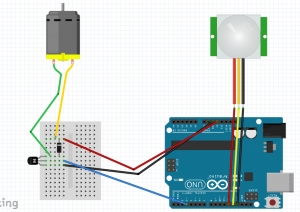
    Adding Bluetooth to the Arduino

    1. To get started on adding bluetooth to the Arduino, you can watch my Arduino Bluetooth Basics Tutorial
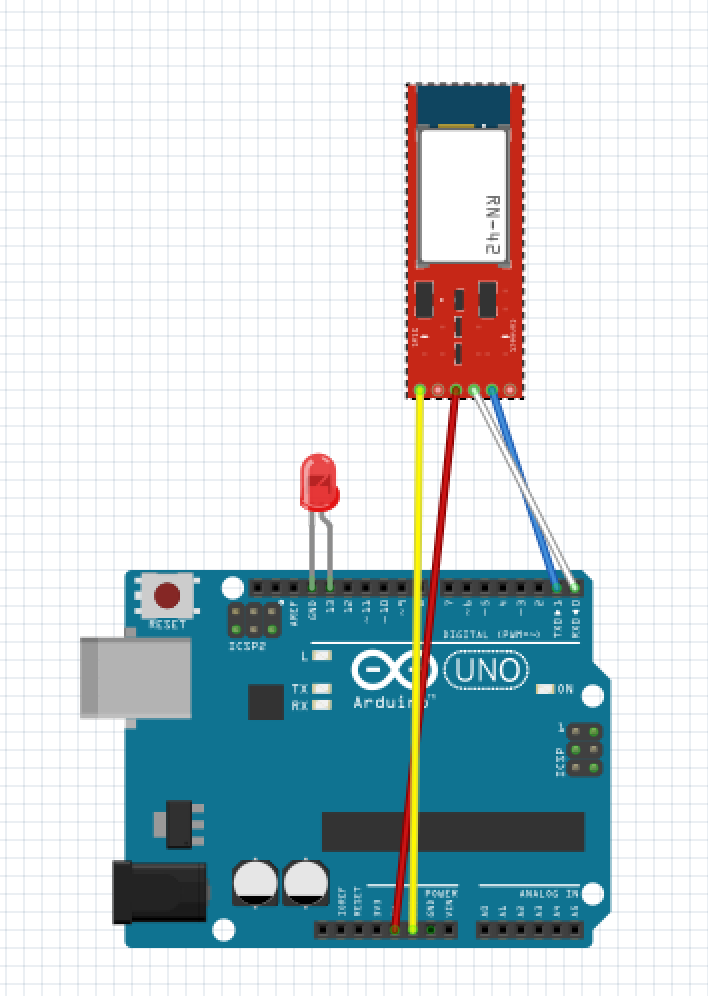
    2. For a wiring diagram, you can reference my Fritzing sketch. (You need to download Fritzing
      in order t. view this.)

      h-bridge-wiring

    [tabby title=”Step 2″]

    Software

    Android

    1. To find your bluetooth’s MAC address, a good program to use is called Ardudroid on the Google Play store.
    2. To control the car, Tolik777 has created a great app that you can download from here and install on your Anrdoid device.

    Arduino

    1. The first thing you need to to is download the Arduino software for your computer.
    2. Then you need to copy this code to a new sketch and upload it to your Arduino device. Code provided by
     
    #include "EEPROM.h"
    
    #define D1 2          // direction of motor rotation 1
    #define M1 3          // PWM left motor
    #define D2 4          // direction of motor rotation 2
    #define M2 5          // PWM right motor
    #define HORN 13       // additional channel 1
    //#define autoOFF 2500  // milliseconds after which the robot stops when the connection
    
    #define cmdL 'L'      // UART-command for left motor
    #define cmdR 'R'      // UART-command for right motor
    #define cmdH 'H'      // UART-command for additional channel (for example Horn)
    #define cmdF 'F'      // UART-command for EEPROM operation
    #define cmdr 'r'      // UART-command for EEPROM operation (read)
    #define cmdw 'w'      // UART-command for EEPROM operation (write)
    
    char incomingByte;    // incoming data
    
    char L_Data[4];       // array data for left motor
    byte L_index = 0;     // index of array L
    char R_Data[4];       // array data for right motor
    byte R_index = 0;     // index of array R
    char H_Data[1];       // array data for additional channel
    byte H_index = 0;     // index of array H
    char F_Data[8];       // array data for  EEPROM
    byte F_index = 0;     // index of array F
    char command;         // command
    
    unsigned long currentTime, lastTimeCommand, autoOFF;
    
    void setup() {
      Serial.begin(9600);       // initialization UART
      pinMode(HORN, OUTPUT);    // additional channel
      pinMode(D1, OUTPUT);      // output for motor rotation
      pinMode(D2, OUTPUT);      // output for motor rotation
      /*EEPROM.write(0,255);
      EEPROM.write(1,255);
      EEPROM.write(2,255);
      EEPROM.write(3,255);*/
      timer_init();             // initialization software timer
    }
    
    void timer_init() {
      uint8_t sw_autoOFF = EEPROM.read(0);   // read EEPROM "is activated or not stopping the car when losing connection"
      if(sw_autoOFF == '1'){                 // if activated
        char var_Data[3];
        var_Data[0] = EEPROM.read(1);
        var_Data[1] = EEPROM.read(2);
        var_Data[2] = EEPROM.read(3);
        autoOFF = atoi(var_Data)*100;        // variable autoOFF ms
      }
      else if(sw_autoOFF == '0'){        
        autoOFF = 999999;
      }
      else if(sw_autoOFF == 255){
        autoOFF = 2500;                      // if the EEPROM is blank, dafault value is 2.5 sec
      }
      currentTime = millis();                // read the time elapsed since application start
    }
     
    void loop() {
      if (Serial.available() > 0) {          // if received UART data
        incomingByte = Serial.read();        // raed byte
        if(incomingByte == cmdL) {           // if received data for left motor L
          command = cmdL;                    // current command
          memset(L_Data,0,sizeof(L_Data));   // clear array
          L_index = 0;                       // resetting array index
        }
        else if(incomingByte == cmdR) {      // if received data for left motor R
          command = cmdR;
          memset(R_Data,0,sizeof(R_Data));
          R_index = 0;
        }
        else if(incomingByte == cmdH) {      // if received data for additional channel
          command = cmdH;
          memset(H_Data,0,sizeof(H_Data));
          H_index = 0;
        }   
        else if(incomingByte == cmdF) {      // if received data for EEPROM op
          command = cmdF;
          memset(F_Data,0,sizeof(F_Data));
          F_index = 0;
        }
        else if(incomingByte == '\r') command = 'e';   // end of line
        else if(incomingByte == '\t') command = 't';   // end of line for EEPROM op
        
        if(command == cmdL && incomingByte != cmdL){
          L_Data[L_index] = incomingByte;              // store each byte in the array
          L_index++;                                   // increment array index
        }
        else if(command == cmdR && incomingByte != cmdR){
          R_Data[R_index] = incomingByte;
          R_index++;
        }
        else if(command == cmdH && incomingByte != cmdH){
          H_Data[H_index] = incomingByte;
          H_index++;
        }   
        else if(command == cmdF && incomingByte != cmdF){
          F_Data[F_index] = incomingByte;
          F_index++;
        }   
        else if(command == 'e'){                       // if we take the line end
          Control4WD(atoi(L_Data),atoi(R_Data),atoi(H_Data));
          delay(10);
        }
        else if(command == 't'){                       // if we take the EEPROM line end
          Flash_Op(F_Data[0],F_Data[1],F_Data[2],F_Data[3],F_Data[4]);
        }
        lastTimeCommand = millis();                    // read the time elapsed since application start
      }
      if(millis() >= (lastTimeCommand + autoOFF)){     // compare the current timer with variable lastTimeCommand + autoOFF
        Control4WD(0,0,0);                             // stop the car
      }
    }
    
    void Control4WD(int mLeft, int mRight, uint8_t Horn){
    
      bool directionL, directionR;      // direction of motor rotation L298N
      byte valueL, valueR;              // PWM M1, M2 (0-255)
      
      if(mLeft > 0){
        valueL = mLeft;
        directionL = 0;
      }
      else if(mLeft < 0){
        valueL = 255 - abs(mLeft);
        directionL = 1;
      }
      else {
        directionL = 0;
        valueL = 0;
      }
     
      if(mRight > 0){
        valueR = mRight;
        directionR = 0;
      }
      else if(mRight < 0){
        valueR = 255 - abs(mRight);
        directionR = 1;
      }
      else {
        directionR = 0;
        valueR = 0;
      }
       
      analogWrite(M1, valueL);            // set speed for left motor
      analogWrite(M2, valueR);            // set speed for right motor
      digitalWrite(D1, directionL);       // set direction of left motor rotation
      digitalWrite(D2, directionR);       // set direction of right motor rotation
      
      digitalWrite(HORN, Horn);           // additional channel
    }
    
    void Flash_Op(char FCMD, uint8_t z1, uint8_t z2, uint8_t z3, uint8_t z4){
    
      if(FCMD == cmdr){           // if EEPROM data read command
        Serial.print("FData:");       // send EEPROM data
        Serial.write(EEPROM.read(0));     // read value from the memory with 0 address and print it to UART
        Serial.write(EEPROM.read(1));
        Serial.write(EEPROM.read(2));
        Serial.write(EEPROM.read(3));
        Serial.print("\r\n");         // mark the end of the transmission of data EEPROM
      }
      else if(FCMD == cmdw){          // if EEPROM data write command
        EEPROM.write(0,z1);               // z1 record to a memory with 0 address
        EEPROM.write(1,z2);
        EEPROM.write(2,z3);
        EEPROM.write(3,z4);
        timer_init();             // reinitialize the timer
        Serial.print("FWOK\r\n");         // send a message that the data is successfully written to EEPROM
      }
    }
    

    [tabby title="Links"]

    Follow Tinkernut!
    Google +
    Facebook
    Twitter
    [tabbyending]


  • Arduino Bluetooth Basics


    [tabby title=”Overview”]
    This video will show you the basics of controlling an Arduino through bluetooth. Click the “Step” tags for a walkthrough!


    [tabby title=”Step 1″]

    Acquiring the Parts
    Here’s what you will need:

    • A Bluetooth Capable Smartphone (I’ll be using an Android).
    • An Arduino ($10.99)
    • An Arduino Bluetooth Module ($6.45)
    • An LED ($0.99)

    [tabby title=”Step 2″]

    Wiring

    You can download the Fritzing sketch here.

    Screen Shot 2014-03-08 at 7.38.33 PM

    [tabby title=”Step 3″]

    Software

    Android

    A good Android program for Arduino is called Ardudroid on the Google Play store.


    Arduino

     
    int ledPin = 13; 
    int state = 0;
    int flag = 0; 
     
    void setup() {
     pinMode(ledPin, OUTPUT);
     digitalWrite(ledPin, LOW);
     
     Serial.begin(9600); // Default connection rate for my BT module
    }
     
    void loop() {
    
     if(Serial.available() > 0){
     state = Serial.read();
     flag=0;
     }
    
     if (state == '0') {
     digitalWrite(ledPin, LOW);
     if(flag == 0){
     Serial.println("LED: off");
     flag = 1;
     }
     }
    
     else if (state == '1') {
     digitalWrite(ledPin, HIGH);
     if(flag == 0){
     Serial.println("LED: on");
     flag = 1;
     }
     }
    }

    [tabby title=”Links”]

    Follow Tinkernut!
    Google +
    Facebook
    Twitter
    [tabbyending]


  • How To Revive An Old iPod


    [tabby title=”Overview”]
    This tutorial is for those of you that love to tear apart old technology to make it useful again. Someone gave me a broken 5th Generation iPod classic, and in this video I show you how to fix it and upgrade it to something awesome!


    [tabby title=”Links”]
    Where to buy the parts: http://www.tarkan.info/store
    Rockbox Download: http://www.rockbox.org

    Follow Tinkernut!
    Google +
    Facebook
    Twitter
    [tabbyending]


  • How to Make A Rogue Identity


    [tabby title=”Overview”]
    This video shows you how to keep your identity secret online while making a fake identity to take it’s place. Below are all the links used in this video.


    [tabby title=”Steps”]
    PROXIES AND VPN

    How To Hide Your IP Address – http://www.youtube.com/watch?v=FBpfrg3z0TI
    Chrome Proxy Plugin – https://chrome.google.com/webstore/detail/proxy-switchy/caehdcpeofiiigpdhbabniblemipncjj
    Foxy Proxy – https://addons.mozilla.org/en-US/firefox/addon/foxyproxy-standard/
    CyberGhost – http://cyberghostvpn.com/
    Make Your Own VPN – http://www.youtube.com/watch?v=bpkRWvPWiOY
    Paid VPN Service – https://www.witopia.net/

    HIDE YOUR BROWSING HISTORY

    Prevent Being Tracked Online – http://www.youtube.com/watch?v=nJ045WSs7gw
    Chrome Plugin (Do Not Track Plus) – https://www.abine.com/dntdetail.php
    Plugin for All Browsers (Ghostery) – http://www.ghostery.com/
    Tor Browser – https://www.torproject.org/
    SRWare Iron – http://www.srware.net/software_srware_iron.php

    GENERATE A FAKE IDENTITY

    FakeNameGenerator – http://www.fakenamegenerator.com/
    DataFakeGenerator – http://www.datafakegenerator.com/

    DISPOSABLE EMAIL ADDRESSES

    10MinuteMail – http://10minutemail.com/
    GuerrillaMail – https://www.guerrillamail.com/
    MailNesia – http://mailnesia.com/

    Last Weeks Tutorial (How To Find Free WiFi) – http://www.youtube.com/watch?v=ASdzY7Gy0DQ
    Last Weeks Comments Show – http://www.youtube.com/watch?v=FxyecJ3Dugk

    [tabby title=”Links”]

    Follow Tinkernut!
    Google + http://goo.gl/1dmi1
    Facebook http://www.facebook.com/tinkernut
    Twitter http://www.twitter.com/tinkernut
    [tabbyending]


  • How To Find Free Wifi


    This video shows you some common tips for never being wifi-less again!


    [tabby title=”Overview”]
    This video shows you some common tips for never being wifi-less again!


    [tabby title=”Steps”]
    Websites and apps for finding free wifi

    [tabby title=”Links”]

    Follow Tinkernut!
    Google+
    Facebook
    Twitter

    [tabbyending]


  • Cheap Ways To Stream Youtube To Your TV


    Here are some cheap alternatives to stream to your TV from your computer, Android devices, or iOS devices.

    Chromecast Basics:
    http://www.youtube.com/watch?v=K7mUOPggOG4

    Use your Android or iOS device as a Chromecast:
    http://www.youtube.com/watch?v=Arx-xi84XnQ

    Turn a Raspberry Pi into a Media center:
    http://www.youtube.com/watch?v=vFI5BntUi6g